Shower grab bars. We’ve seen them everywhere. Many of them require tools or causing some amount of change to your existing shower or bathroom.
But what if you can’t use tools or make changes to your existing bathroom?
Luckily, there are some alternatives that you can use to assist you or your loved one with getting in and out of a shower or tub that do not require tools or making changes to your bathroom.
Today, we will look at some of those alternatives.
Shower Grab Bars That Do Not Require Tools
Let’s get started!
First things first, I’m going to tell you about the world’s simplest, most inexpensive grab bar solution. It’s also quite popular.
Option #1: The suction cup grab bar
Suction cup grab bars can be purchased just about anywhere. The one I show off in the video is grabbed off of Amazon for 7 bucks, which is pretty inexpensive.
They come in different sizes. The one I use in the video is the smallest size. Basically, the size of one hand. They do have some that are longer that you could use it for two hands or if you want it to span a longer distance. I recommend the smaller ones, because they seem to hold a little bit better.
How to Install a Suction Cup Shower Grab Bar – Steps:
- Check the Condition of the Suction Cup Grab Bar
- Check for Obstructions
- Secure the Suction Cup Grab Bar
- Safety Check
Required Tools
- None (of course!)
Please note: Before we begin, you need to make sure you follow all the instructions and warnings provided by the manufacturer. The steps below are only to provide guidance with installing or assembling equipment, but you should always follow the warnings and instructions provided by the manufacturer.
Step #1: Check the Condition of the Suction Cup Grab Bar
First, you need to check the condition of your grab bar. Obviously, the most important part is that the suction cups maintain the suction. You also need check that the rubber is in good shape.
The suction cup grab bar should come with two clips. When they are down, it’s in suction mode. When they are released and in the up position, it’s ready to be popped off of whatever it’s attached to, so you are going to want the clips up when you go to install.
This particular brand does not come with an indicator tab, but you will find others that have a small indicator tab on either side, which usually are red and green. The indicator is red when the suction cup grab bars are not attached to anything. The indicator is green when they’re fully suctioned to the wall. This particular brand doesn’t have that, so if you’re using this type, you’re going to have to test it with your hand, which is a little less safe, but still works.
Step #2: Check for Obstructions
The shower where we are going to install our suction cup grab bar in has a smooth surround. This suction cup grab bar also works well in showers with tile if the tile is large enough to fit this entire suction cup. The grab bar cannot overlap grout or it will not hold. The tile needs be very smooth.
This shower does have a few bevels. You want to avoid any bevels or lines when you go to install the grab bar.
Step #3: Secure the Suction Cup Grab Bar
The installation is very simple, very quick, but it does require a little bit of muscle, so you may have to have a little help if you’re dealing with strength issues.
Basically, you’re going to pick your spot on the surround where you want it, and you’re going to press it in firmly until the rubber and the plastic on the grab bar suction cups are touching. At this point, you’re going to press the gray levers into place, which takes some doing.
Step #4: Safety Check
Now that the grab bar is in place, you will want to give it a little jiggle test and see that it’s firmly attached. I usually tell folks that they want to plan on removing them, cleaning them, replacing them a couple times. Pretty regularly in fact. Usually, as much as every time they use the shower, but because they’re so easy to do, and it’s not too cumbersome.
CAUTION: Suction cup grab bars are NOT meant to support your full weight. Do not attempt to pull yourself up or put all of your weight on a suction cup grab bar while getting into or out of a shower or while bathing.
The nice thing about this option is when you are done, you release the two levers and then pop them off, and you leave no damage to your tub, so these are a really nice option for both the simplicity and the affordability.
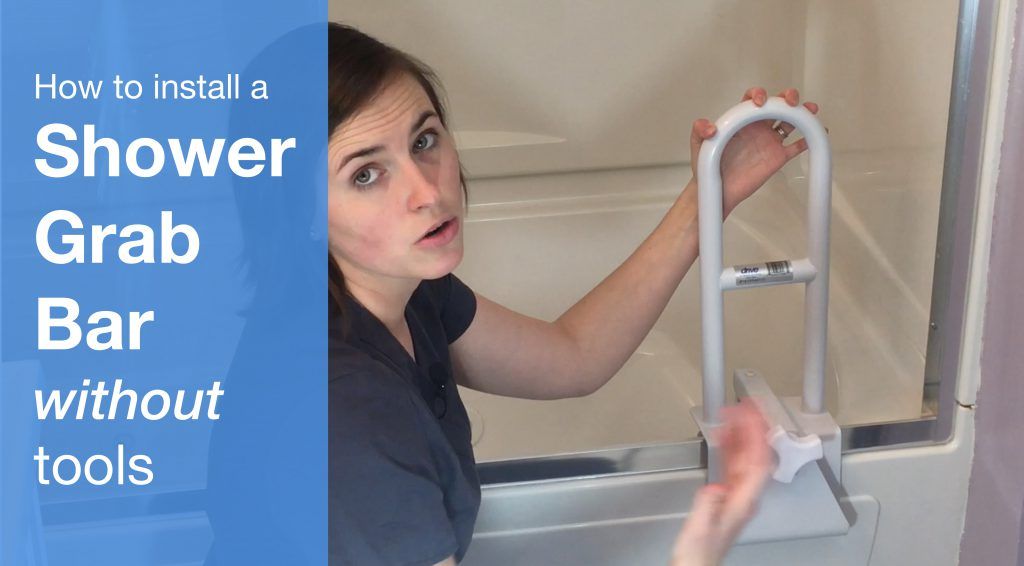
Option #2: Bathtub Safety Rail
The second option that I really like is also pretty inexpensive. It’s called the Bathtub Safety Rail. The one we use in the video is by Drive. It is going to give you about 14 and a half inches of height, and it’s going to attach to the tub, so this only works in setups where you have a tub-shower combination. It attaches to a tub with a width of 3 inches to 7 inches.
Bathtub safety rails are pretty darn sturdy. They consist of a clamp on one end, which has some rubber on it to help it hold in place as well to protect your tub. If you do have a porcelain tub or an older tub, it is important to make sure that that rubber is good condition. I will often add a little bit of extra padding using rubberized shelf liners to it, and that will help protect the tub as well. This extra padding can help especially if you are getting one second-hand.
How to Install a Bathtub Safety Rail – Steps:
- Decide on Placement
- Place and Secure the Bathtub Safety Rail
- Safety Check
Required Tools
- None (of course!)
Step #1: Decide on placement
Bathtub safety rails are extremely simple to install. They require very little effort, but you need to decide where you want it in your tub. In this particular bathtub, because they have a glass surround, my options are slightly more limited.
If you are somebody who has physical limitations and you are having to add equipment to your shower, glass surrounds make it really, really difficult. I highly recommend considering removing the glass surround and putting in a standard shower curtain.
In this situation, you want to put it towards the back of the tub, so what you are going to do is make sure your clamp is open, wider than your tub, and you are going to set it in place.
Step #2: Place and secure the bathtub safety rail
Once you place the safety rails, you are going to attach it with the clamp and hand tighten it in place. You don’t want to go too crazy with tightening because it is going to put some pressure on your tub.
Step #3: Safety Check
Once it is in place, give it a little jiggle. Make sure it’s not going anywhere. You will see that the bathtub safety rails has two different grab points. It will have a low one and a high one. The high one is great for stepping in and out of the tub, whereas, the lower one works pretty well if you’re down in the bathtub taking a soak, and then you need to get yourself back up.
It’s pretty common to see a bathtub safety rails paired with a suction cup grab bar, and that’s perfectly functional for a lot of folks. With both devices in place, you will have two points to grab then, and it’s much more stable.
Both are nice stable options. No tools required. I haven’t had to do any damage to my walls. If I’m renting, that’s often not an option to add grab bars, so this is a great solution in those situations.
That’s pretty much it. Thank you.
Note: This post contains affiliate links that provide a small commission with no additional cost to the user.
More Recent Posts
- How to Sleep After a C-Section or Abdominal Surgery

 Recovering from a C-Section, appendectomy, abdominoplasty, or other abdominal surgery can feel overwhelming, especially when it comes to something as essential as sleep. With a tender incision and limited mobility, finding a comfortable position may seem impossible—and yet, proper rest is critical for healing! In this …
How to Sleep After a C-Section or Abdominal Surgery Read More »
- How to Get In and Out of the Car after Hip Replacement
 Getting in and out of a car after a hip replacement can feel like navigating an obstacle course. Ensuring you move safely and avoid unnecessary strain on your healing hip is essential for a smooth recovery. Whether you’re heading to a follow-up appointment or simply enjoying …
How to Get In and Out of the Car after Hip Replacement Read More »
- A Complete Guide to Lower Body Dressing After Hip Replacement Surgery
 Recovering from hip replacement surgery (or similar traumatic injury) comes with its challenges, especially when it comes to everyday tasks like getting dressed. While your mobility may be temporarily limited, dressing your lower body can be made much easier with the right strategies and tools. This …
A Complete Guide to Lower Body Dressing After Hip Replacement Surgery Read More »