Tub transfer benches (known commonly as “tub benches”) can be difficult to assemble, which is unfortunate because they are important to safety when it comes to taking a shower in a house or apartment.
But assembling a tub bench doesn’t have to be a night and can actually be straightforward with a few simple guidelines.
I’ve put together some guidelines as a few simple steps.
How to Assemble a Tub Bench – Steps:
- Check for All Pieces
- Insert Leg Extensions
- Install Feet
- Install Back Rest
- (Optional) Install Arm Rest
- Safety Check
Required Tools
This kind of toilet seat requires no tools and requires no additional skill in installation.
Please note: Before we begin, you need to make sure you follow all the instructions and warnings provided by the manufacturer. The steps below are only to provide guidance with installing or assembling equipment, but you should always follow the warnings and instructions provided by the manufacturer.
Let’s get started!
Step #1: Check for all pieces
Tub transfer benches come in a variety of models, but the one I’m going to show you is a pretty standard tub transfer bench with a solid plastic body. They do come in the padded form, but most of them are assembled in roughly the same manner.
The first thing you want to make sure is you have all of the parts. If you’re buying them used, or even if you get them new, sometimes there will be parts that are missing. You want to check that out before you get them assembled.
You should have a base. You shouldn’t need any tools to attach the other pieces to the base. Obviously, if you’re getting it used, check, make sure everything is solid, nothing has corroded or rusted or gotten damaged over time. This is a good time to check that out.
You should have four leg extension pieces. They’re going to go on the four posts. You should have four leg pieces. Now, the leg pieces are going to be different. You’ve got two that have standard bottoms that are slightly slanted, these go outside the tub, as well as two that have suction cup bottoms meant to go inside the tub to help the bench be secured in place. You should have two of each.
You’re going to have a back rest, and then you’re going to have your back rest mount. In addition, this one doesn’t have it in this particular model, but in some of them, you’ll also have an arm rest piece, which is a U-shaped piece that’s bent slightly outwards.
Step #2: Insert Leg Extensions
Let’s get started. You first need to put the leg extender pieces on first. They’re all going to be the click button type. These can get really tough to use if they’ve been sitting in the water for a lot of years or a lot of use, get soap scum in there or whatever. So if you need to, add a little CLR or something in there to kind of loosen them up, get them moving again, before you try to reassemble.
We’re going to slide the leg extension pieces in and we’re going to go until we hear the snap. The gray neck pieces on the extenders should be in place when you go to install. These leg extension go in pretty tough and they’re supposed to, because they really are meant to hold very steady.
Step #3: Insert Feet
Okay, so now, easy part’s done. At this point, we’re going to install the feet and the back rest. You should know what tub you’re putting the tub bench in and where the shower head is going to come from, because you need to know which side needs the special suction cup feet. The suction cup feet should be placed on the side that is going inside the tub, depending on which way your shower head is.
The legs will have a variety of markers on them. You’re going to use the markers based on the height of the person that’s going to be using it. Most people can start somewhere in the middle, sometimes marked as 5 or 6.
You always want to go a little taller than you think you need to because the higher it is, the easier it is to get up and down from. In this case, our legs go all the way up to nine, which will accommodate a rather tall person, somebody well over 6′. You need to make sure that you put the suction cup ones on the same side and that they are set at the same height.
Now, in some tubs, the other side, which are going to have the non-suction cup legs, are not going to be at the same height because of the angle of the floor versus the angle of the tub bottom. That’s something you’ll want to address when you get to the tub.
So, if you’re installing, or putting this together somewhere not next to the tub, you may be doing some adjusting when you get it into the bathroom.
In this situation, I’m going to keep them all at the same height. Some leg rests are going to be slightly slanted. The slant should be going in towards the other legs.
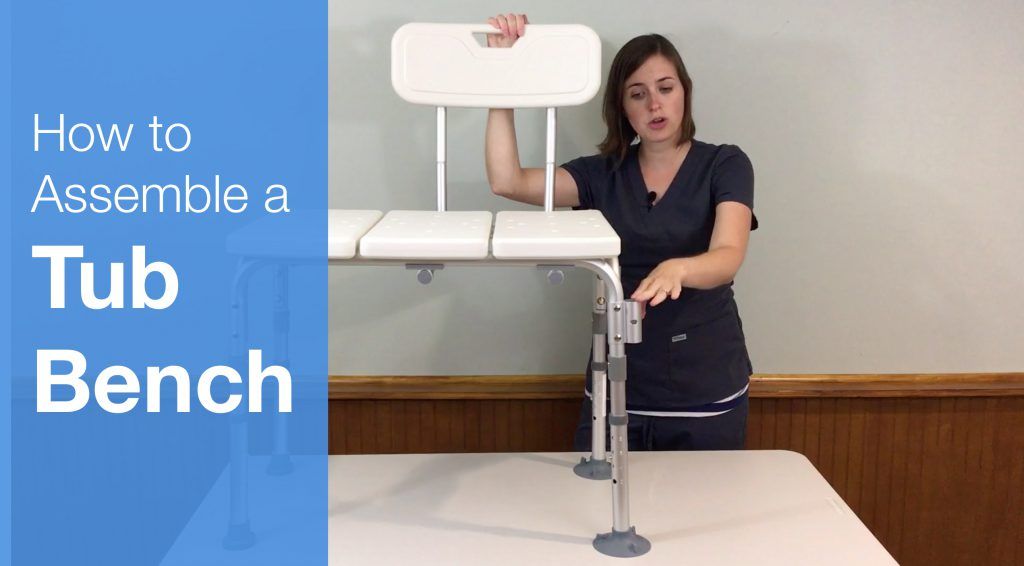
Step #4: Install Back Rest
First, flip the base over onto its legs, because we’re going to install the back rest.
Now, this is important, the back rest is always going to go on the same side as your suction cup feet, because it’s going to go inside the tub. The important thing to recognize is there are four rings unmounted underneath the base when it is standing up. These rings are meant to hold the back rest in place if you slide the back rest in from either direction, depending on, again, where your shower head is.
The back rest pieces use the button system, like the legs, and should slide in and snap into place. The back rest piecies are going to have a little wiggle to them because they’re meant to be easy to switch around, depending on how your shower setup is. Once they are in place, you’re going to slide your back rest on the pieces until it snaps into place.
Step #4: (Optional) Install Arm Rest
Now, again, your tub may come with an arm rest. The arm rest would go into the two cylinders on the side of one of the pairs of legs. The arm rest will have an angle to it and you want the arm rest to be angled out. You don’t want it angled in, because it’ll impede your space for sitting.
Step #5: Safety Check
Now that everything is installed and assembled, you need to perform a safety check. You should always perform a safety check before using a product. In this case, you should check the tub bench for safety at least twice. Once after you have assembled the bench, and again after you have installed it in the shower.
After assembly, you need to check that everything is secure and sturdy. Check that all the buttons have snapped into place and the tub bench feels sturdy and secure.
I hope this has been helpful. Thank you so much.
Note: This post contains affiliate links that provide a small commission without any added cost to the user.
More Recent Posts…
- How to Sleep After a C-Section or Abdominal Surgery

 Recovering from a C-Section, appendectomy, abdominoplasty, or other abdominal surgery can feel overwhelming, especially when it comes to something as essential as sleep. With a tender incision and limited mobility, finding a comfortable position may seem impossible—and yet, proper rest is critical for healing! In this …
How to Sleep After a C-Section or Abdominal Surgery Read More »
- How to Get In and Out of the Car after Hip Replacement
 Getting in and out of a car after a hip replacement can feel like navigating an obstacle course. Ensuring you move safely and avoid unnecessary strain on your healing hip is essential for a smooth recovery. Whether you’re heading to a follow-up appointment or simply enjoying …
How to Get In and Out of the Car after Hip Replacement Read More »
- A Complete Guide to Lower Body Dressing After Hip Replacement Surgery
 Recovering from hip replacement surgery (or similar traumatic injury) comes with its challenges, especially when it comes to everyday tasks like getting dressed. While your mobility may be temporarily limited, dressing your lower body can be made much easier with the right strategies and tools. This …
A Complete Guide to Lower Body Dressing After Hip Replacement Surgery Read More »