So, you know you need a grab bar to prevent falls.
But maybe you don’t have a wall nearby to add one. Or maybe you need a grab bar temporarily and don’t want to add holes to your walls or your tile bathrooms.
Well, worry no more. I have a no-drill grab bar solution that I LOVE for these situations.
Let me explain.
Grab bars are a standard piece of home medical equipment for reducing falls and improving independence during transfers.
The biggest problem with them is the challenge of finding a place to mount a grab bar.
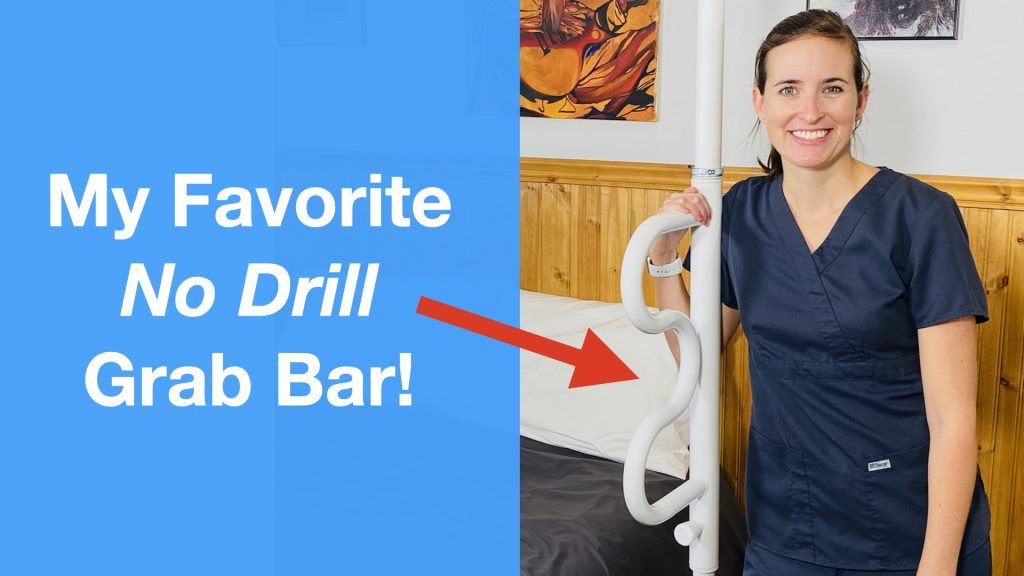
That’s why one of my favorite grab bar systems is the no-drill security pole grab bar. This grab bar is a great option to improve flexibility of grab bar placement. This piece of equipment can be used in the bedroom, bathroom, living room, or any other space with a solid floor and ceiling! I have personally used this style of no-drill grab bar in many homes for a variety of physical limitations and have been thrilled with the results.
Installing the security pole no-drill grab bar system requires the environment to have a flat, solid, ceiling, and floor. It is possible to add screws to the floor and ceiling pieces to secure them in place, but this is not essential in most situations for the function of the equipment. No tools, aside from the wrench included with the product, will be needed during installation.
Check out my video below on my YouTube Channel EquipMeOT to see this awesome product in action!
But if you prefer written instructions, I can explain below.
Supplies Needed:
- The Stander Security Pole with Curved Grab Bar (there are other types of floor to ceiling grab bars, but this is my favorite design)
- Optional: Drill, drywall anchors (this will be needed if you are choosing to screw the base and top of the grab bar into the drywall)
- A level
Steps:
- Identify location in your home that needs additional grab bar support. **Must have flat floor and solid, flat ceiling
- Assemble security pole (with extender if ceiling is taller than 7 feet)
- Set grab bar in place
- Tighten locking nut until ceiling and floor pieces are secure
Installing a No-Drill Grab Bar – Step 1: Identify Location
The first step is to identify the location where you would like to place a grab bar.
This grab bar can be placed anywhere in the home where a solid/flat floor and ceiling are present.
This means this particular grab bar will not work in a space that has open ceilings, drop ceilings, or angled ceilings (vaulted rooms or dormers). I recommend installing them on solid floors or very tight weave carpets as a thick, plush carpet can impact the stability of the pole and stability is crucial in a grab bar solution in order to prevent falls.
Installing a No-Drill Grab Bar – Step 2: Assemble the Grab Bar
Assembling the grab bar is the second step.

Make sure you have all the pieces before you begin assembly. Assembly of this particular stander security pole will involve placing the base or floor piece (round) on the ground and then stacking each piece on top in order.

In the case of the Stander security pole, the base is followed by the grab bar piece, then the extension (only if your ceiling is over 7 feet), and then the top portion (H-shape) which touches the ceiling.
The parts come with flat sides to help align the parts as you assemble which is extremely helpful.

There are pins with locks to be placed at the top and bottom to secure the pieces together.

Installing a No-Drill Grab Bar – Step 3: Set Grab Bar in Place
Positioning the grab bar in place requires knowledge of how and why you will be needing the additional support.
The grab bar portion of the Stander Security Pole can rotate around its axis. The grab bar will lock into place every 45 degrees for all 360 degrees. This rotation allows for great flexibility.
Due to the pivoting nature of the grab bar, there is abundant flexibility of use. If you choose to attach the floor and ceiling pieces with screws, you will want to check for ceiling joists to drill into at this time before tightening the pole into position.

Installing a No-Drill Grab Bar – Step 4: Tighten pole into position
Using the wrench supplied by the kit, tighten the adjusting nut to push the top up and tight to the ceiling. If you have a level, you can ensure the pole is perfectly vertical and therefore most secure.

Note: If you plan to secure the pole into position using the set screws provided, I recommend you pre-mark the position on the ceiling with a pencil using the H-shaped piece. These marks will allow you to maintain the proper position to allow the screws to be placed.
That’s it! That’s all it takes to install. Hope you enjoyed learning about one of my favorite no-drill grab bars ever.
Note: This post contains affiliate links that provide a small commission with no additional cost to the user.
More Recent Posts
- How to Sleep After a C-Section or Abdominal Surgery

 Recovering from a C-Section, appendectomy, abdominoplasty, or other abdominal surgery can feel overwhelming, especially when it comes to something as essential as sleep. With a tender incision and limited mobility, finding a comfortable position may seem impossible—and yet, proper rest is critical for healing! In this …
How to Sleep After a C-Section or Abdominal Surgery Read More »
- How to Get In and Out of the Car after Hip Replacement
 Getting in and out of a car after a hip replacement can feel like navigating an obstacle course. Ensuring you move safely and avoid unnecessary strain on your healing hip is essential for a smooth recovery. Whether you’re heading to a follow-up appointment or simply enjoying …
How to Get In and Out of the Car after Hip Replacement Read More »
- A Complete Guide to Lower Body Dressing After Hip Replacement Surgery
 Recovering from hip replacement surgery (or similar traumatic injury) comes with its challenges, especially when it comes to everyday tasks like getting dressed. While your mobility may be temporarily limited, dressing your lower body can be made much easier with the right strategies and tools. This …
A Complete Guide to Lower Body Dressing After Hip Replacement Surgery Read More »